Create and test a naming template
Turn a file naming convention into a reusable template, then test its fields, AI guidance, formatting, and organization settings.
RenamerX naming templates turn your file-naming convention into a reusable rule. A template defines what each new filename contains and how RenamerX formats it.
Choose fields such as Date, Title, Subject, Location, Organization, Type, or Identifier and put them in the required order. Then set the separator, Date format, output language, and folder organization. RenamerX fills the information it can identify and creates a consistent name.
If you have not defined a naming convention yet, start with File Naming Best Practices and File Naming Conventions, or use one of the built-in templates.
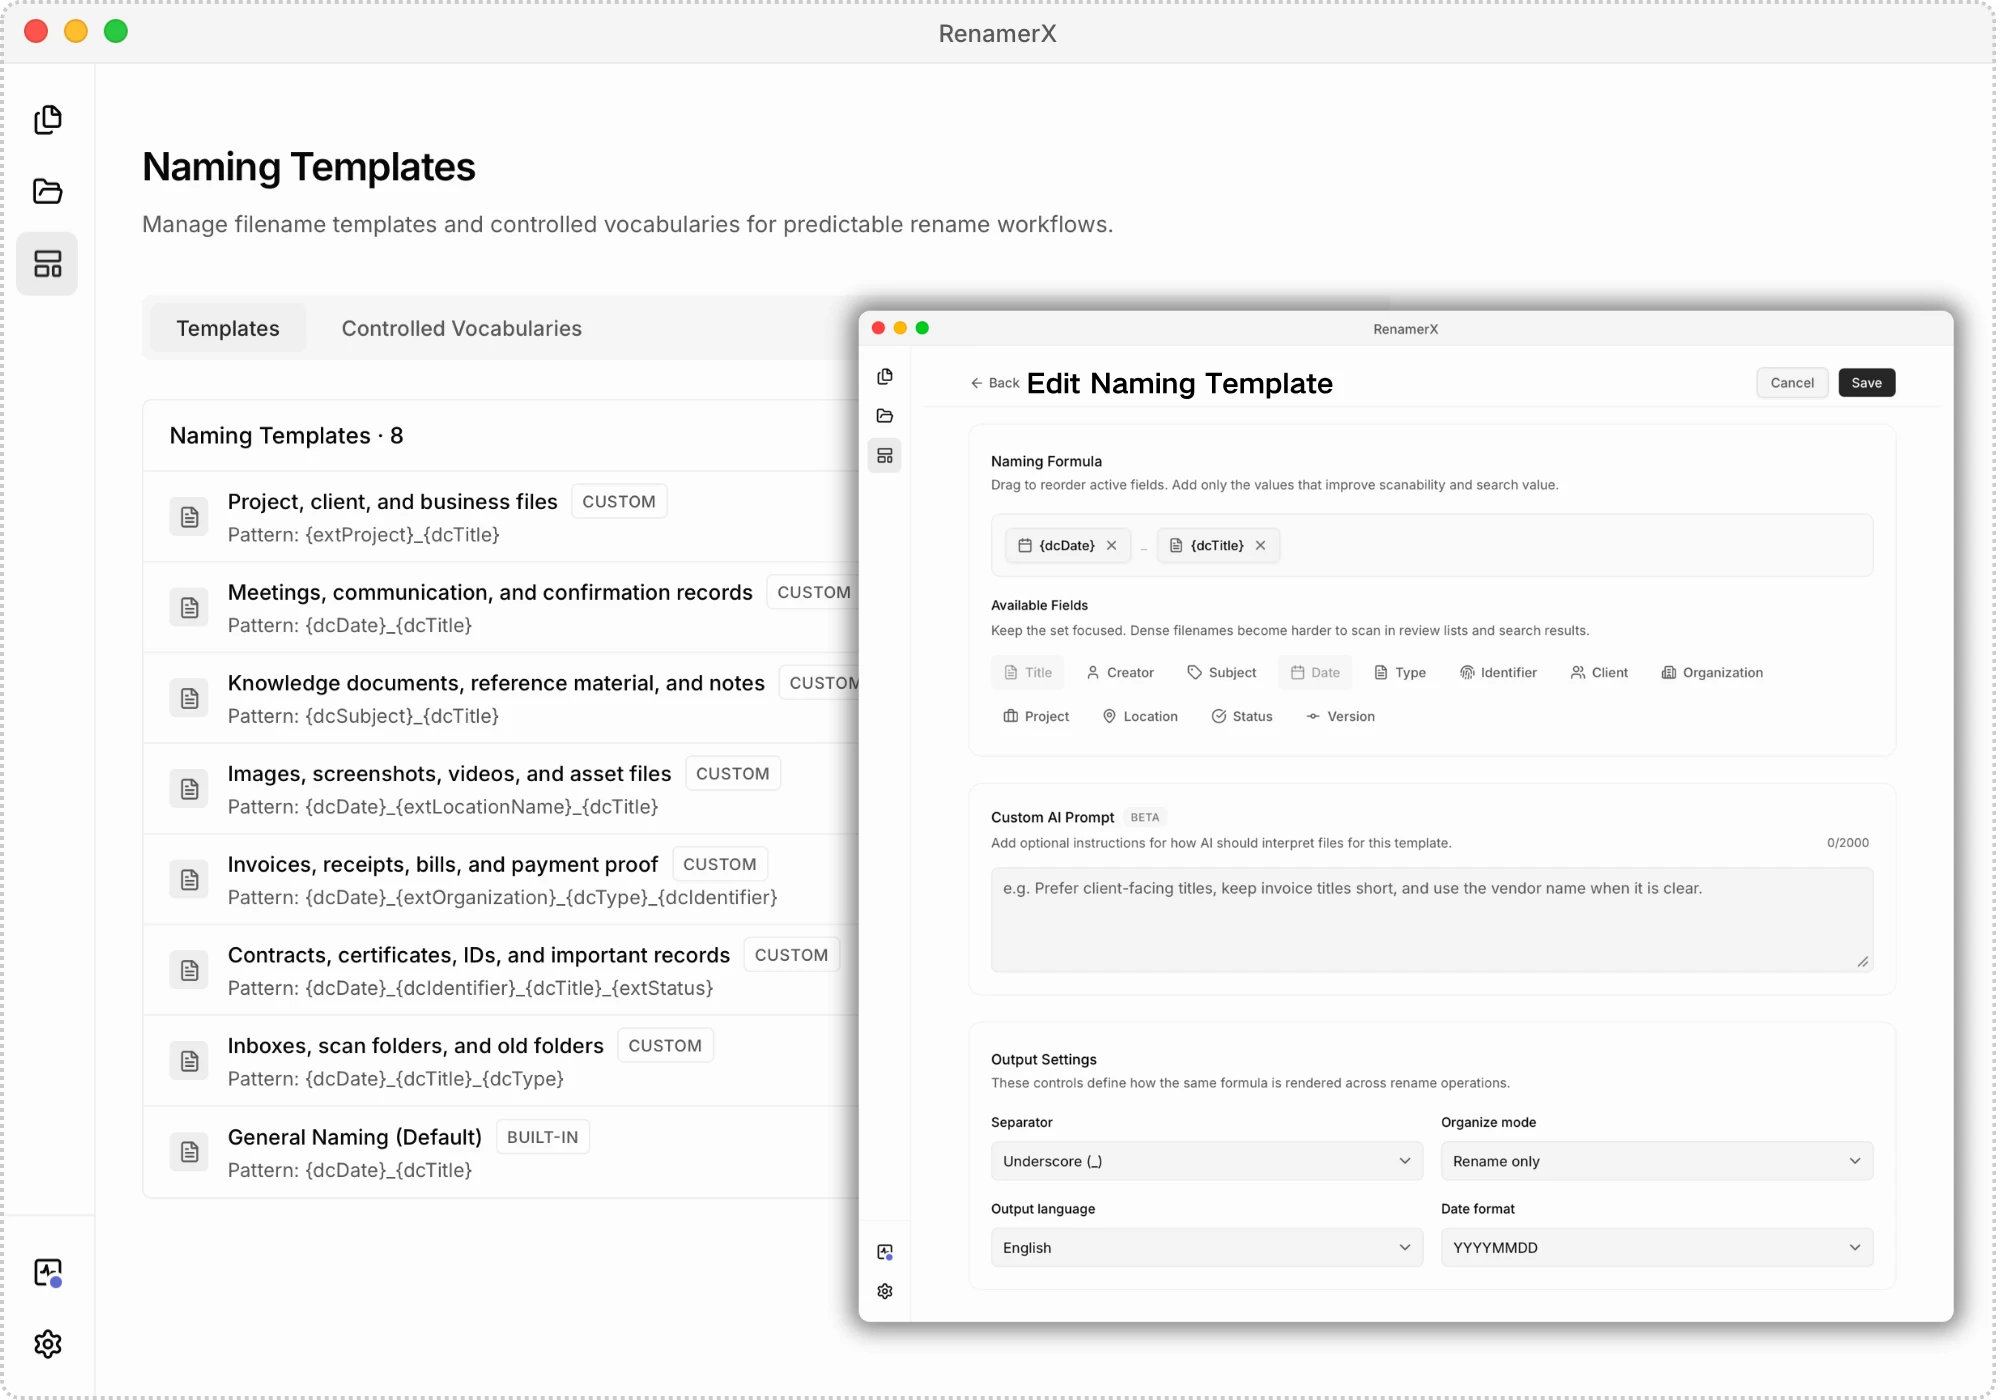
Decide what the filename should contain
Use one template for one kind of file that follows the same naming rule. Start with how people will find those files later, then choose the few details that help them recognize and locate each file.
Answer these questions before opening the editor:
- Files: Which files share this rule, such as invoices, meeting records, project deliverables, or travel photos?
- Finding files: Will people look for them by date, project, client, organization, identifier, or another detail?
- Filename details: Which three to five values help people recognize, sort, search, or distinguish the files?
- Shared names: Which recurring Subjects, Types, Statuses, Organizations, or Projects need one agreed name?
- Missing information: Does the rule still work when a file is incomplete, unclear, or outside its original folder?
Put the detail people look for most near the front. Remove fields that repeat the folder path or do not help people find the file. Create separate templates when two kinds of files need different first fields, prompts, or organization rules.
See File Naming Best Practices when you still need to define the convention. The template should implement that convention, not replace the design work behind it.
Create a naming template
Create the filename formula before tuning the other settings:
- Open Naming Templates.
- Select the Templates tab.
- Select the plus button above the template list.
- Enter a recognizable Template Name.
- Add fields from Available Fields.
- Drag the active fields into the required order.
- Configure Custom AI Prompt and Output Settings as needed.
- Check Preview Outputs.
- Select Save.
A new template starts with Date, Subject, Title, and Type. It also starts with an underscore, YYYY-MM-DD, and Rename only. Its output language follows the current app language when RenamerX supports that language, and otherwise uses English.
You must keep at least one field in Naming Formula. Use a short Template Name that identifies the files, such as Vendor Invoices or Project Deliverables.
Start with the built-in templates
RenamerX creates two built-in templates when a new installation completes first-launch setup:
| Template | Fields | Starting format |
|---|---|---|
| General Naming Template (Default) | Date, Title | YYYYMMDD, underscore, Rename only |
| Image & Video Naming Template | Date, Location, Title | YYYYMMDD, underscore, Rename only |
Their output language follows the interface language selected during setup. Built-in template names appear in the current interface language. A custom template name stays exactly as you entered it.
You can edit a built-in template, but you cannot delete it. Existing installations that completed setup before the Image & Video template was introduced may not receive it automatically; create a custom Date + Location + Title template when it is absent.
Build the naming formula
The editor offers 12 filename fields. The table lists their UI labels and the tokens shown in Naming Formula.
| Field | Token | Field | Token |
|---|---|---|---|
| Title | {dcTitle} | Creator | {dcCreator} |
| Subject | {dcSubject} | Date | {dcDate} |
| Type | {dcType} | Identifier | {dcIdentifier} |
| Client | {extClient} | Organization | {extOrganization} |
| Project | {extProject} | Location | {extLocationName} |
| Status | {extStatus} | Version | {extVersion} |
The field order becomes the filename order. Use these placement rules as a starting point:
- Start with Date when chronological browsing matters.
- Start with Project or Client when work is retrieved by account or workstream.
- Keep Identifier near the front when an official number is the main lookup key.
- Put broad context before the specific Title.
- Put Status and Version near the end.
RenamerX omits a selected field when it cannot obtain a reliable value. If every selected field is unavailable, RenamerX cannot create a suggested filename. Review field meanings, evidence sources, and empty-value behavior in the Naming Fields Dictionary.
Description (dcDescription) is not a filename field. RenamerX generates it separately for review and can write it to the metadata of supported files.
Custom AI Prompt
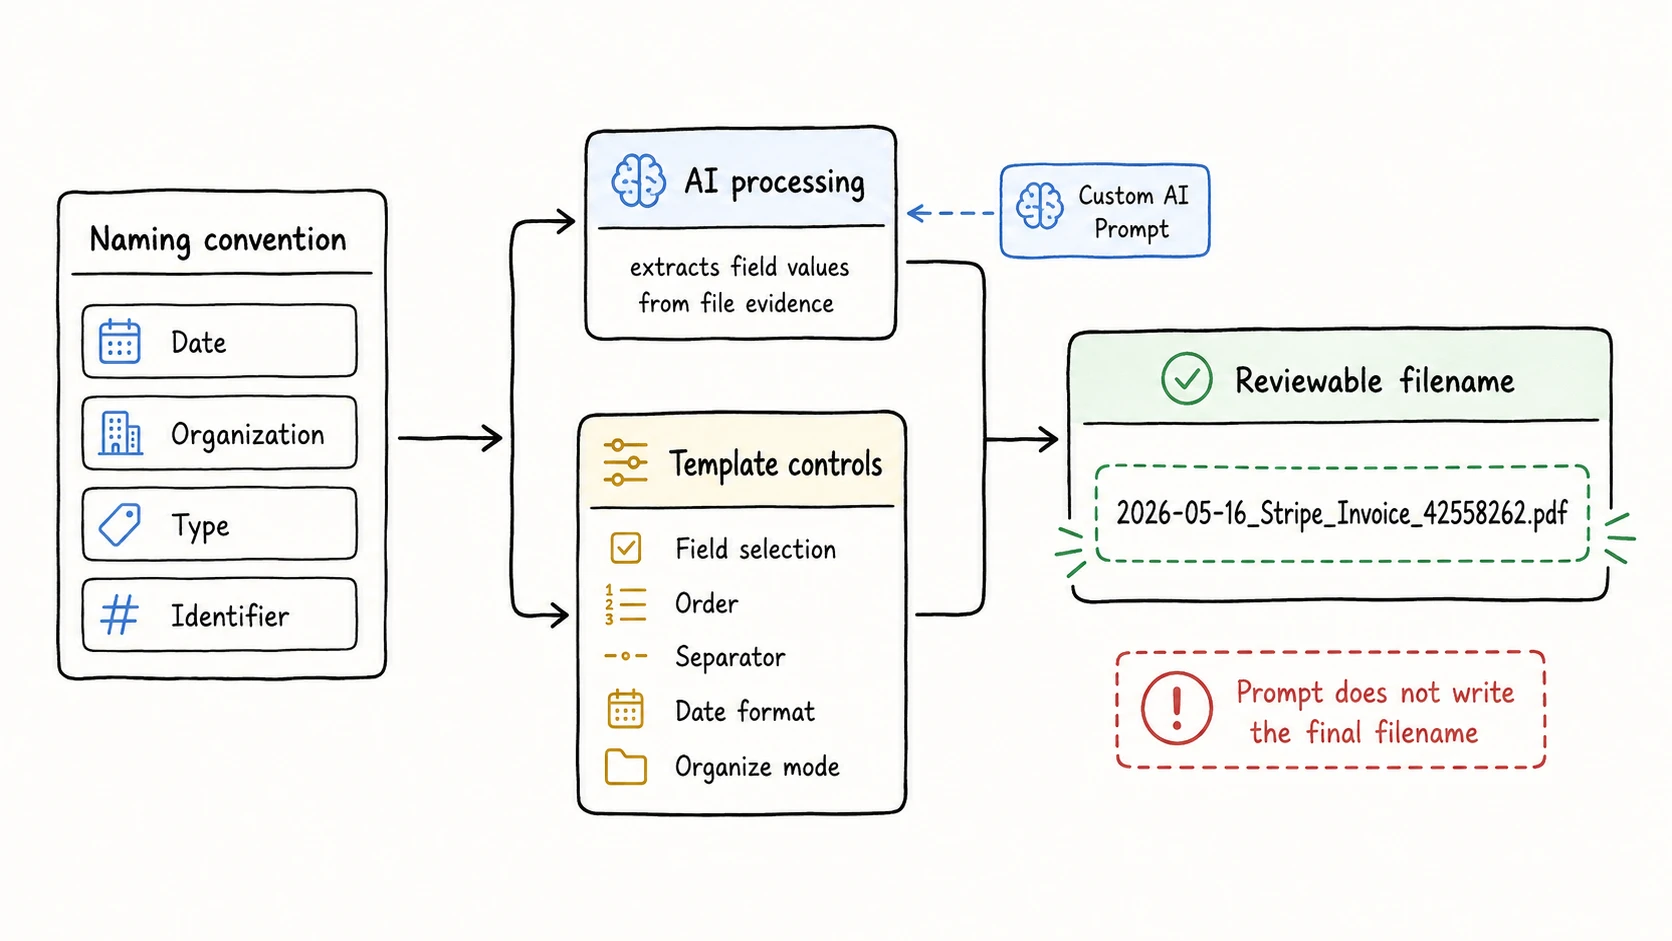
Custom AI Prompt is a Beta setting for instructions that apply only to this template. It accepts up to 2,000 characters and helps RenamerX interpret details that could have more than one meaning.
Use the prompt to resolve a specific problem:
Use the signing date only when the agreement states it explicitly.Keep Title focused on the agreement subject and omit standard legal boilerplate.Use the invoice issuer as Organization, not the buyer or payment processor.
Keep formatting rules out of the prompt. Configure field order, separator, Date format, Organize mode, and Output language with their editor controls.
The prompt cannot add an unselected filename field or write a free-form final filename. It should not ask RenamerX to invent missing facts. When the file lacks sufficient evidence, the affected field should remain empty for review.
Choose output formatting and folder organization
Each Output Settings control has a separate role:
| Setting | Available values | Effect |
|---|---|---|
| Separator | Underscore (_), Hyphen (-) | Joins filename fields in the selected order |
| Organize mode | Rename only, By Subject, By Type, By Organization, By Project, By Date | Chooses whether RenamerX only renames files or also classifies them into folders inside a target folder |
| Output language | English, Chinese, Japanese, Spanish | Directly controls the language of Title and Description; other fields retain source facts when possible |
| Date format | YYYYMMDD, YYYYMM, YYYY-MM-DD, YYYY-MM, YYYY | Formats the resolved Date in filenames and By Date folders |
Organize mode affects the destination only when the workflow has a target folder. Without a target folder, RenamerX renames files in place. Review the folder paths, required fields, and missing-value results in Organize Files.
RenamerX prefers a reliable date from the file's content. If it cannot find one, it uses the creation date saved in the file and then the file modification date. The template applies Date format after choosing the date. See Date Formatting before choosing a month-only or year-only format.
Check the preview, then test your files
Preview Outputs uses three fixed sample records. It reflects the current field order, separator, and Date format, so you can inspect the basic filename shape before saving.
The preview does not analyze your files. It does not test Custom AI Prompt, Output language, controlled terms, Organize mode, missing fields, character sanitization, or filename conflicts.
Test the saved template before applying it broadly:
- Open Batch Rename.
- Select the new template.
- Add a few files that reflect what you handle regularly.
- Include clear files, unclear filenames, missing fields, and details with more than one possible meaning.
- Select Generate suggestions to create new filenames.
- Review the field values, suggested filenames, and name-based sorting.
- Revise the template when the same problem appears across several files.
- Select Generate suggestions again to create new filenames for the test files.
Each successfully generated filename uses 1 Free credit, including a successful retry. See Credits and License for the complete accounting rule.
Use the template in a Watch Folder only after it works with the files you handle regularly. You should be able to explain the rule in one sentence, and the results should not need the same manual correction repeatedly.
Edit, delete, or split a template
Select a template row or its Edit action to change it. Saving an edit affects later processing, but does not recalculate filename suggestions already in Needs review. Select those files and choose Generate suggestions to process them with the updated template.
Built-in templates can be edited but not deleted. Custom templates have a delete action. A template assigned to a Watch Folder cannot be deleted until you change or remove that assignment. There is no Duplicate or Copy Template action, so create a new template when you need an independent variation.
Example: vendor invoices
Suppose you retrieve invoices by date, vendor, and invoice number. Configure the template with these decisions:
| Decision | Choice | Reason |
|---|---|---|
| Files | Vendor invoices | Every file follows the same naming rule |
| Naming Formula | Date + Organization + Type + Identifier | Keeps time, vendor, document class, and official number separate |
| Separator | Underscore (_) | Keeps field boundaries visible |
| Date format | YYYY-MM-DD | Sorts chronologically and remains readable |
| Output language | English | Generates English Title and Description when needed |
| Organize mode | Rename only during testing | Tests naming before adding folder classification |
| Controlled terms | Approved vendor names and Invoice as a Type | Reduces spelling and category drift |
When files show several organizations, add this Custom AI Prompt:
Use the invoice issuer as Organization. Do not use the buyer or payment processor unless it issued the invoice.
The result can be 2026-05-16_Stripe_Invoice_42558262.pdf. After the template passes testing, choose By Organization when the workflow has a target folder and should classify invoices by vendor.
Test credit notes and receipts before placing them under the same template. Keep one template when Type separates them and the same interpretation rules still work. Create separate templates when they require different fields or repeated prompt exceptions.